Selection_291

Extract Information form Firefox Browser

Hello Everyone! Dumpzilla is a forensic tool written in python 3xx used to extract the all interesting information from the browser can say browser forensic tool. It is a command line tool and available for Kali Linux, windows as well as Mac 32/64 bits systems. With this tool we can extract the information of three browsers FirefoxIceweasel and Seamonkey  browser. It works  in command line interface. The information dumps could be redirected by pipes with tools such as grep, awk, cut, sed etc.

You can extract lot of information including History bookmarks, downloads, password, add-ons, cookies much more. After extraction you can export the data either in JSON or plain text.

You can extract the following data:

Download , History, Bookmarks.

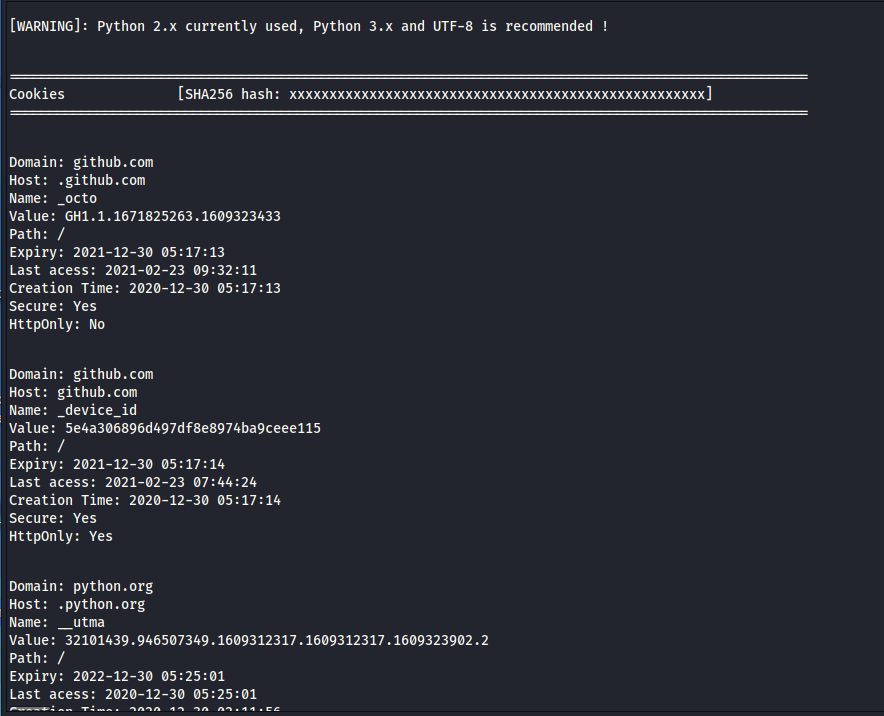
Cookies, session data, browser saved data.

Addons , user preference.

Web forms (Searches, emails, comments)

URL open in each tab

Web Forms etc..

Installation:

Install the Dumpzilla by command line or manually

command: Sudo apt-get install dumpzilla or you can download manually click on bellow link.

Download Link

After download you need to give permission

sudo chmod +x dumpzilla.py and it will be executable.

Now use sudo python dumpzilla.py

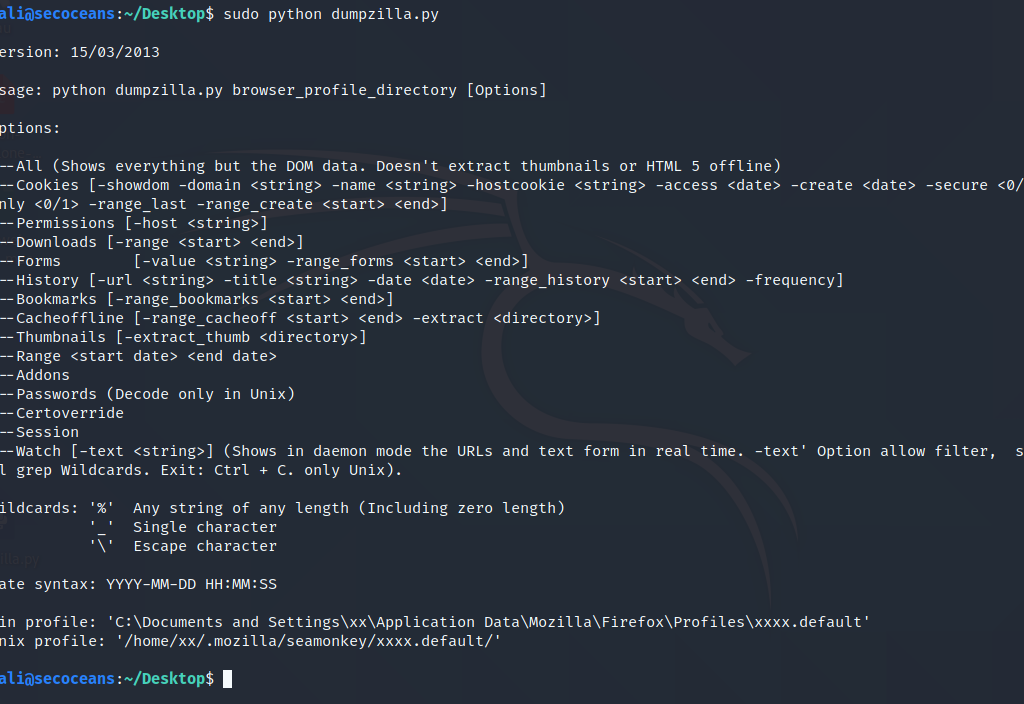
There are many options with that you can extract the information. using –All option you can extract all the information or you can use one by one options like –history it will extract only history:

Lets check how to use:

we need to give a firefox path to extract the data

Kali Linux, Firefox browser path /home/$USER/.mozilla/firefox/xxxx.default –Summary ($user means user and xxx.default means your profile file where your Firefox data saved )

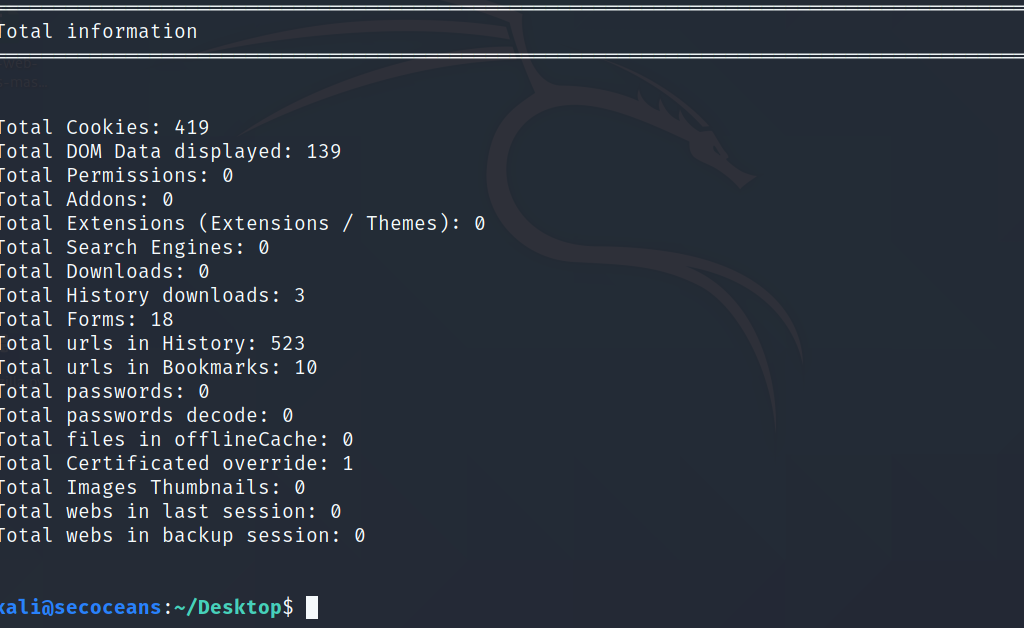
command will be sudo python dumpzilla.py /home/$user/.mozila/firefox/xxx.default/ –All with this command i retrieve the following information:

To extract the information there are lots of arguments use one by one or you can export in a json file will –Export argument

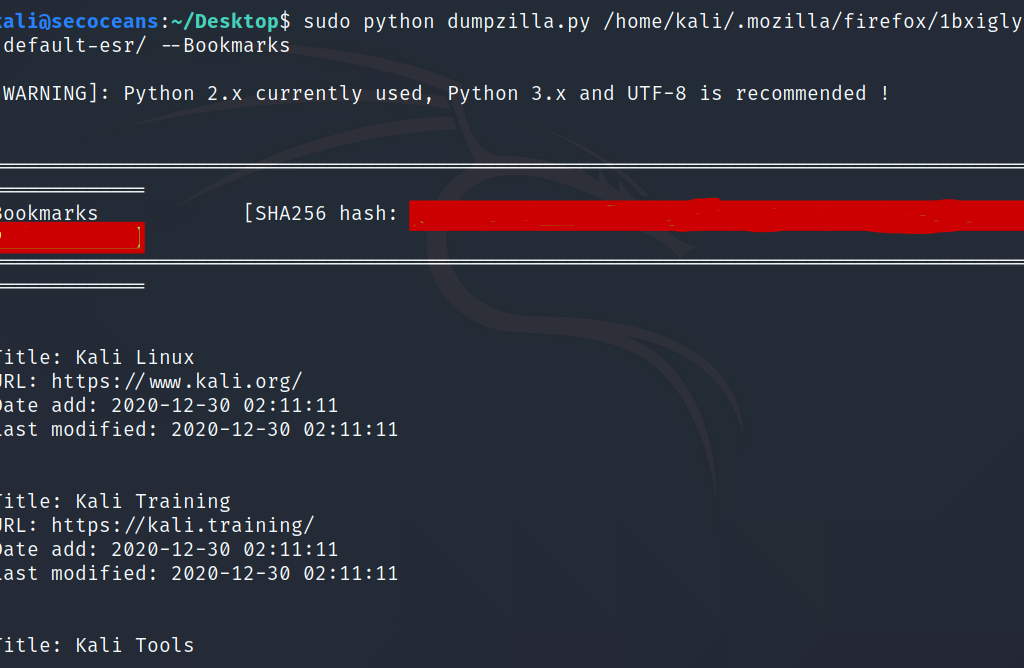
Here i Extract all bookmark with –Bookmarks argument

Export the data in plain text sudo python dumpzilla.py /home/$user/.mozila/firefox/xxx.default/ –All | tee /root/Desktop/mozile

Thank you for Reading

Follow us on LinkedIn, Twitter and Facebook

1_kXyjOpnJyKlqjWZYYzD1LQ

Password Cracking with John the Ripper

 In today’s blog, I am going to show you the password cracking tool JOHN The Ripper

John the Ripper is a free open source password cracking software tool. Developed for the Unix operating system. Now it runs on fifteen different platforms. This tool is also helpful in the recovery of the password, in case you forget your password you can recover your password with this tool. It helps to crack the password stored in the computer in hash form. John the ripper is popular because of the dictionary attacks and is mainly used in brute force attacks.

John the ripper tool is pre-install in kali Linux both the command line and graphical user interface. you can download manually also

Download

The use of this tool in kali linux, steps will be like :-

Proof of concept:-

Open your kali Linux click application and then password cracking option.

 John the Ripper  command line tool.

First we need to add a new user account. I add lucifer

After that we need to check the user password in shadow file.

run the command /etc/passwd and you can check the username lucifer with the encrypted password

Now we need to create a txt file and copy all the shadow password and paste into the txt file

after doing this we need to open the txt file with the john tool

Now we need to decrypt password with command john password.txt  After enter this command hint enter we decrypt all the password listed in the shadow file

command john –show password.txt to show the decrypted password

Thanks For Reading.

Follow us on LinkedIn, Facebook, Twitter

autopsy

USB Data Recovery

USB data recovery with Autopsy tool

Hello Everyone,

In this blog, we are going to discuss the USB Data Recovery with Autopsy tool. Autopsy is an open-source forensic platform used to recover lost, deleted data. Autopsy is a fast, well-planned, exhaustive hard drive investigation solution tool that evolves with your need. the first release in 2000. It has many features like registry analysis, keyword search, email analysis, media playback, multi-user cases, timeline analysis, malicious file detection, and much more.

Installation

An autopsy is easy to install, to download clink on the link and run the Autopsy MSI installer file

follow the instruction and install it.

How to use ?

Lets begin……

Run the Autopsy and click on New case

Now fill the case detail, Case name and Directory to save the case file, and click next.

Now Optional information here add case number and other basic detail and then click on finish.

Now choose we need to use the data source type, in my case local disk and then click on next

Now here we have to click the data source for which we are doing the
investigation process

Here we have the physical USB drive is available so we will click on Local Disk option and then click to next step

Select the required ingest module and click on next

Now it will add the data source and will take some time. Be patience !

The data source is added and click on finish, all the module ingested now you can start investigating

Now open the data source check the deleted file. Here we found a lot of deleted files.

Now we can open deleted data one by one also we can save it. And Our USB Data recovery tutorial with autopsy for digital investigation ends here.

Thanks For Reading !

Follow us on LinkedIn, Facebook, Twitter